Sunday after the stain had dried overnight, I got over to the shop to get the sealer coat sprayed on. Then after lunch I went back to make sure the sealer was dry enough to sand, which is was.
After getting the sealer coat sanded and cleaned off, I switched the airless pump over to the top coat, a semi gloss formula, and began to spray the backside of the doors and drawer fronts first.
These are the backs of some of the drawer fronts that were freshly sprayed.
After a few hours of dry time, they are ready to be flipped so I can spray the frontside.
I took a break for a few hours to let the backsides dry before flipping them over and spraying the frontside. I started at 9:30 and was done by 6:pm. I think I had a total of 4 hours for the whole process not counting the drying time.
The material that I'm using is called a "Conversion Varnish". It's a post-mixed catalyst product [ meaning you need to add 10% of the catalyst to it before you spray to activate it ] that is very durable and will resist scratches and marring. It's also very water resistant unlike a plain Lacquer finish. It dries very quickly and has a very strong odor. It's also very potent stuff and a mask is definitely required. By the time I walked out, I had a big case of the Munchies even wearing a mask.
The doors and drawer fronts are now done and ready to be installed.
Next up, the countertops. I have to wait until my buddy gets some free time so we can cut the cabinet parts out on the router as I do not have any working knowledge of his CAD program or his CNC router.
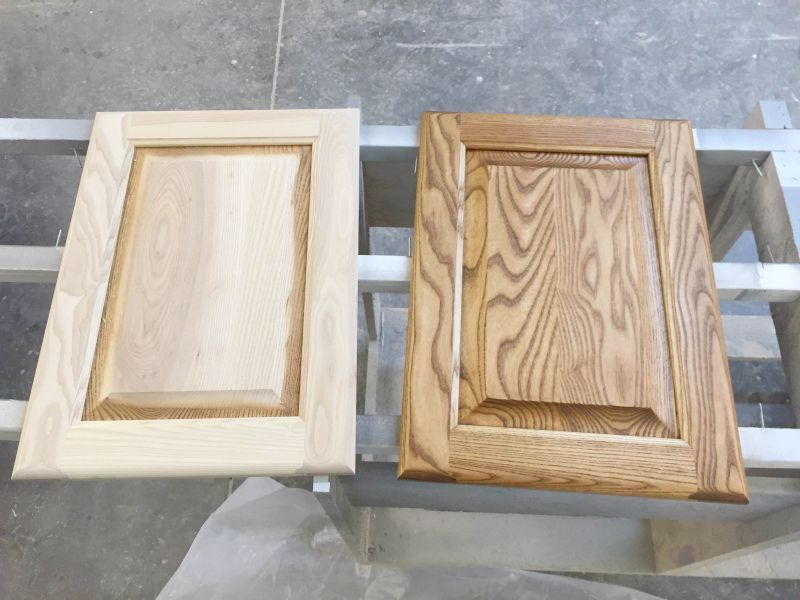
This morning the wife and I got the doors and drawer fronts stained with the Old Masters Provincial penetrating stain.
The color looks darker than it really is for two reasons. 1) it's fresh and 2) I adjusted the photo a bit. Once the top coat is on, the color will pop and it will look much richer and deeper.
Tomorrow after they dry overnight I plan to shoot the sealer coat and then the top coat on them.
Over the last couple of nights I got the most mundane part of the doors done: Hand sanding with the random orbital sander, ugh.
I started out sanding the doors and drawer fronts with #120 grit disks to get the cross grain scratches out from the widebelt sander and the to smooth the routered edges up. Then I switched to #180 grit disks to sand smooth all the surfaces.
Once this was done I needed to bore the doors for the Blum concealed hinges. This is an easy operation with the aid of the Handy Dandy Blum Mini-Press! With the machine I have, not only can you drill the three holes per hinge at once, you can also load a hinge on the insertion bar and "Press" the hinge into the hole you just drilled.
The large hole is 35mm for the hinge cup, the two smaller holes are 8mm for the nylon dowels.
These hinges are the 38N 1/2" overlay hinge with a softclose mechanism built in. They will allow the door to open to 105° They also have a built-in 6 way adjustment feature. By turning three different screws you can adjust the doors Up & Down, Side to Side and In & Out (from the face frame).
Here's how they can be adjusted
Here is the Mini Press in action.
This morning I picked up the Old Master stain, so I hope by the close of Sunday afternoon I will have the doors and drawer fronts stained, sealed and topcoated? The next step will be to get the parts for the cabinet boxes cut out on the CNC router.
After getting the doors glued up I let them dry overnight then took them to a friends shop to use his new (2014) 2 head wide belt sander he got a few years ago. This one makes my single head sander look like something from the dark ages. Hey he offered... :-)
For the first pass of the doors I loaded a #80 on the first head (on the right) and a #120 belt on the second head (left).
The second pass I loaded a #180 belt on the second head and set the first head up so it would touch the doors.
The second head also has a Platen (a metal bar with a stiff cushion of thick felt that pushes the belt down onto the material surface in order to achieve a smoother finish without excess sanding marks). The third and final pass I raised the second head and lowered the Platen so it just kissed the surface of the doors and drawer fronts. This gives the surface a very smooth, even finish.
In the video you can see me turning the knobs to turn the heads on or off on the right of the control panel. I'm not sure what the numbers are telling me on the top left of the panel but the rest set the thickness and the speed of the feed belt. It's a pretty impressive machine!
Anyway, Mother came along to help tail for me to save some footsteps, she's been helping me for years and she also helped out Pop when he had the shop. She's a good helper and well trained.
The next day, back in my shop, I got the router table setup with a 3/4"r bit to edge the doors and drawer fronts with. I used the router table as I did not have a shaper cutter for the edge I wanted.
A quick disclaimer: If you don't have a router table or familiar with a router/router table, I would not recommend trying to climb cut without some sort of feeder or experience.
What I'm doing on the router table is again called "Climb Cutting" Only this time I am not using a power feeder. While it's a large radius cutting bit, I'm not taking off that much material per pass. I also know that Ash machines very well and I have waxed the table down good before running the edges, and have lots of experience doing this.
On the first pass I draw the door to me so that it is running with the direction of the cutter. This allows the bit to remove the majority of the wood without getting any chipping or tearing of the grain, then I run the door through against the cutter (in the normal way) which the bit is then only skimming off a small amount of material without chipping or tearing, giving the surface a nice smooth, clean cut.
Again I would not recommend this unless you have or are familiar with the tool, the material and have some experience with a router or router table.
Here's the edge. Several quick passes with the orbital sander will smooth these up and remove the small line on top left by the router bit.
All done, ready to polish sand with the random orbital sander, ugh....the most monotonous part.
After getting these sanded, I'll punch the holes on the backside of them for the concealed hinges and then off to the stain and finishing booth.
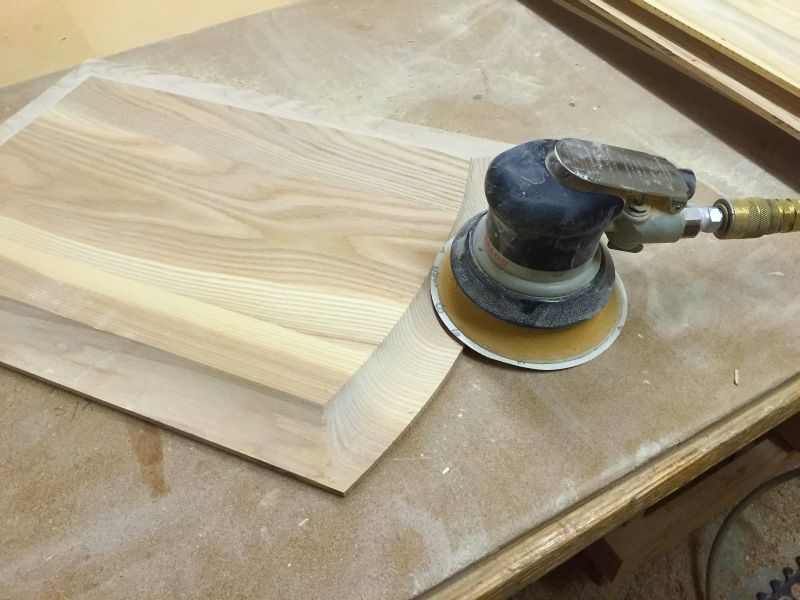
With all the panels shaped and raised, it's time to sand the panels.
I use a pneumatic Dynabrade random orbital sander for this job. The pad is flexible enough to mold to the convexed shape. #180 paper makes quick work of this job. I sand both the shaped portion and the back of the panel. The front will get smoothed up when I run the doors through the Wide Belt sander later.
Once all the panels have been sanded, I stained the outer edges of each panel. Doing this will keep from having an unstained lined appear months later when the panels expand or contract with the seasons.
All stained and stacked up in an ascending order ready to be mated up with the stiles and rails.
Before mating them with the panels, I insert a 5/16" x 5/16" x 1" Panel Buddy. These are made of fairly stiff, but flexible foam rubber and is used to keep the panel centered in the frame. It also allows some expansion and contraction of the panel. Some guys do not use these and only make the panels about a 1/16" to 1/8" less than needed. Buy my OCD tells me to use them as not only will keep the panels centered in the frames, it also keeps them from rattling inside the frame.
I guess it's a personal choice...
A completed frame ready to match to the panel.
A short while later I have them all mated and stacked, ready to assemble.
I grab the first two doors, a pair, and lay out the pieces prior to gluing.
Assembled, ready to go to the clamp
The first door is done.
30 minutes later I have all 16 doors on the cart, drying.
Next up, running them through the Wide Belt sander...
Tonight I found time to get the panels for the doors worked on. First thing to be done was to mark and cut the arch on the top of the panel.
This was done much the same way the arch was cut into the top rail, by use of another jig fixture but with opposite patterns.
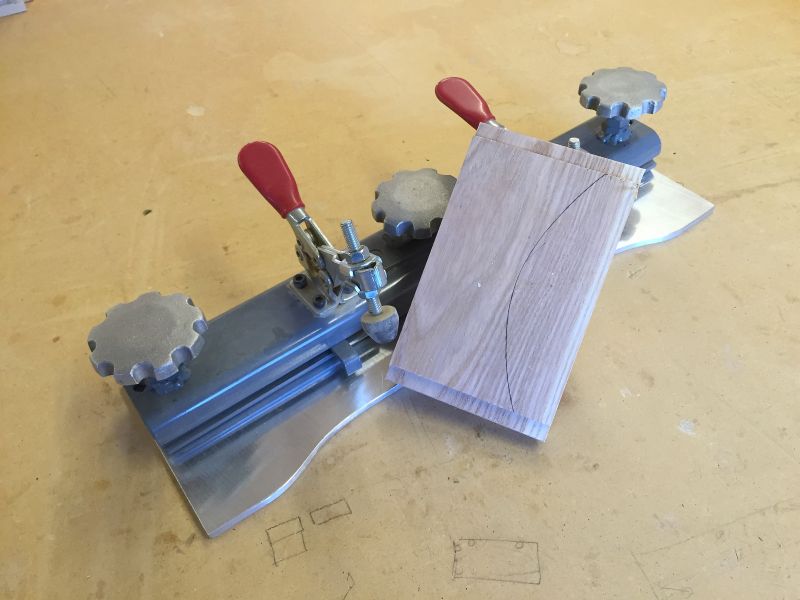
First I inserted the pattern and then positioned one end of the panel to the edge of the pattern.
Second, I strike a pencil line to mark the pattern shape on the panel.
Third, I cut the panel on the bandsaw as close to the line as possible. It doesn't have to be perfect as the panel will extend into the groove in the rail and will never be seen. The pattern will ride on another bearing to give a nice straight line.
Once all the panels have been cut, I clamped them into the jig with the matching pattern and now it's off to the shaper.
Again you can see the silver bearing below the panel cutter, this is what the pattern will ride on while making the shape. The cutter head is a three wing cutter, about 4" in diameter. You can also see an aluminum plate above the cutter. This is for safety and it helps keep the chips from flying upwards.
With all of the arches raised on the shaper, I replaced the shaper fence and set up the power feeder to do the remaining three sides of the panels, as well as the three lower doors that are square.
All the panels are now done and piled on the cart ready to be sanded, then assembled.
The last thing to do was to test fit a couple of the doors to make sure everything was shaped properly.
I made good use of the last day of the last four day holiday weekend of 2015.
This morning I was able to get the door panels out of the clamps and planed down to 5/8" thick, followed with a few trips through the widebelt sander using a 180 grit belt to smooth the panels up.
Using the sliding table attachment on the tablesaw, I squared one end and trimmed the other end to length then got them piled back on the cart. For now that's as far as I can go with the panels until I get the arches laid out on the upper door rails.
The next step was to get the door frames milled with the shapers for the cope and stick profiles. The vertical stiles are on the right of the cart and the horizontal rails are on the left side.
To do this I have two shapers set up, one for the cope profile and one for the stick profile. The cope is done on the ends of the rail using a sled with a hand clamp. The pieces are inserted in the sled face down.
Next I ran the Sticking and the bottom rails [the top rails will be arched with a separate operation] through the second shaper to cut the sticking profile.
On this shaper I have a power feeder attached as I run the pieces face down with the direction of the cutter head. This is the opposite direction than one normally would run through a shaper, it's called "Climb Cutting".
While this image shows the operation using a hand router, it's the same process when using a table shaper.
This is the reason for the power feeder, it keeps the pieces held securely to the table and against the fence, otherwise the cutter head would grab the pieces and shoot them out of your hands.
Why do I do it this way you ask?
Climb cutting allows one to shape the material without getting any "Blowouts or Tearing of the grain". With a climb cut, you don't get the splintering that you often get with a bit or shaper head fed counter-clockwise.
Climb cutting also has a burnishing effect on the wood, leaving an exceptionally smooth routed surface. I also hate having to make pieces over due to the blowouts or tearing.
This is what you get after the parts have been run through both shapers, I nice snug fitting joint.
Now that I had the stiles and bottom rails shaped for the cope and sticking, arching the the top rail was the next step. Using patterns and a pattern jig I placed the smallest top rail in the jig and sized it up with the appropriate sized pattern.
Marked it with a pencil
Then cut it on the bandsaw to get the majority of the material removed.
I repeated this step for all 13 pieces and took them over to the shaper that I used to cut the sticking profiles. For this operation I removed the entire shaper fence leaving just the spindle showing with the cutter head.
Just above the cutter head you can see a large silver bearing, this bearing rides on the pattern acting like the fence. This allowed me to shape a curved piece of material with the sticking profile.
When I got the first rail shaped, I assembled a test frame to make sure things were fitting properly.
All the frame parts restacked on the cart, ready to assemble once I get the panels done.
With this step finished, I can now grab the corresponding patterns for the door panels and using a similar method, I can start arching the tops of the panels to match the top rails.
With today being a holiday where not much happens (other than recovering from a hangover which I did not because I don't drink), I was able to take advantage of the free day and made some good progress on the doors and drawer fronts for my kitchen.
This morning I double checked my parts list against the actual frames and started ripping up the material.
After getting the material ripped and milled, I got them chopped up on the Up Cut saw, then stacked them on the cart.
But before I can run them through the shapers for the Cope and Stick profiles, I need to cut the Arch in the 4-1/4" upper rails.
Next I started cutting up the panels for the doors. I got the pieces cut for length, then matched them up for an oversized width and marked them.
Next step was to joint the edges before gluing them up.
Once jointed, good old bar clamps, lots of bar clamps were used to glue the panels together.
Done!!! I'll let these dry thoroughly overnight. A good day of progress.